How To Make A Crochet Magic Ring
There is definitely a benefit to using a crochet magic ring, or magic circle, over the traditional beginning chain where you slip stitch into a ring. What is that benefit? There will be no space in the center of your project. It will completely “seal” and leave no hole.
Here are the steps to making the magic ring. It may take some practice, so don’t give up!
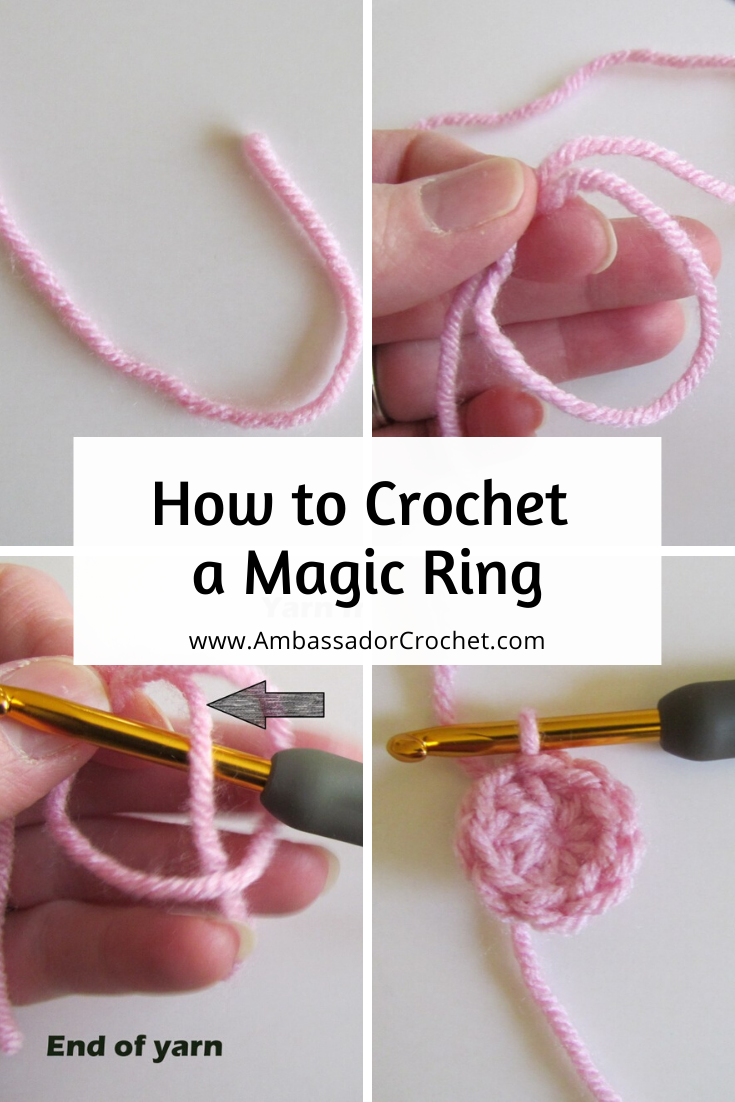
Magic Ring Tutorial
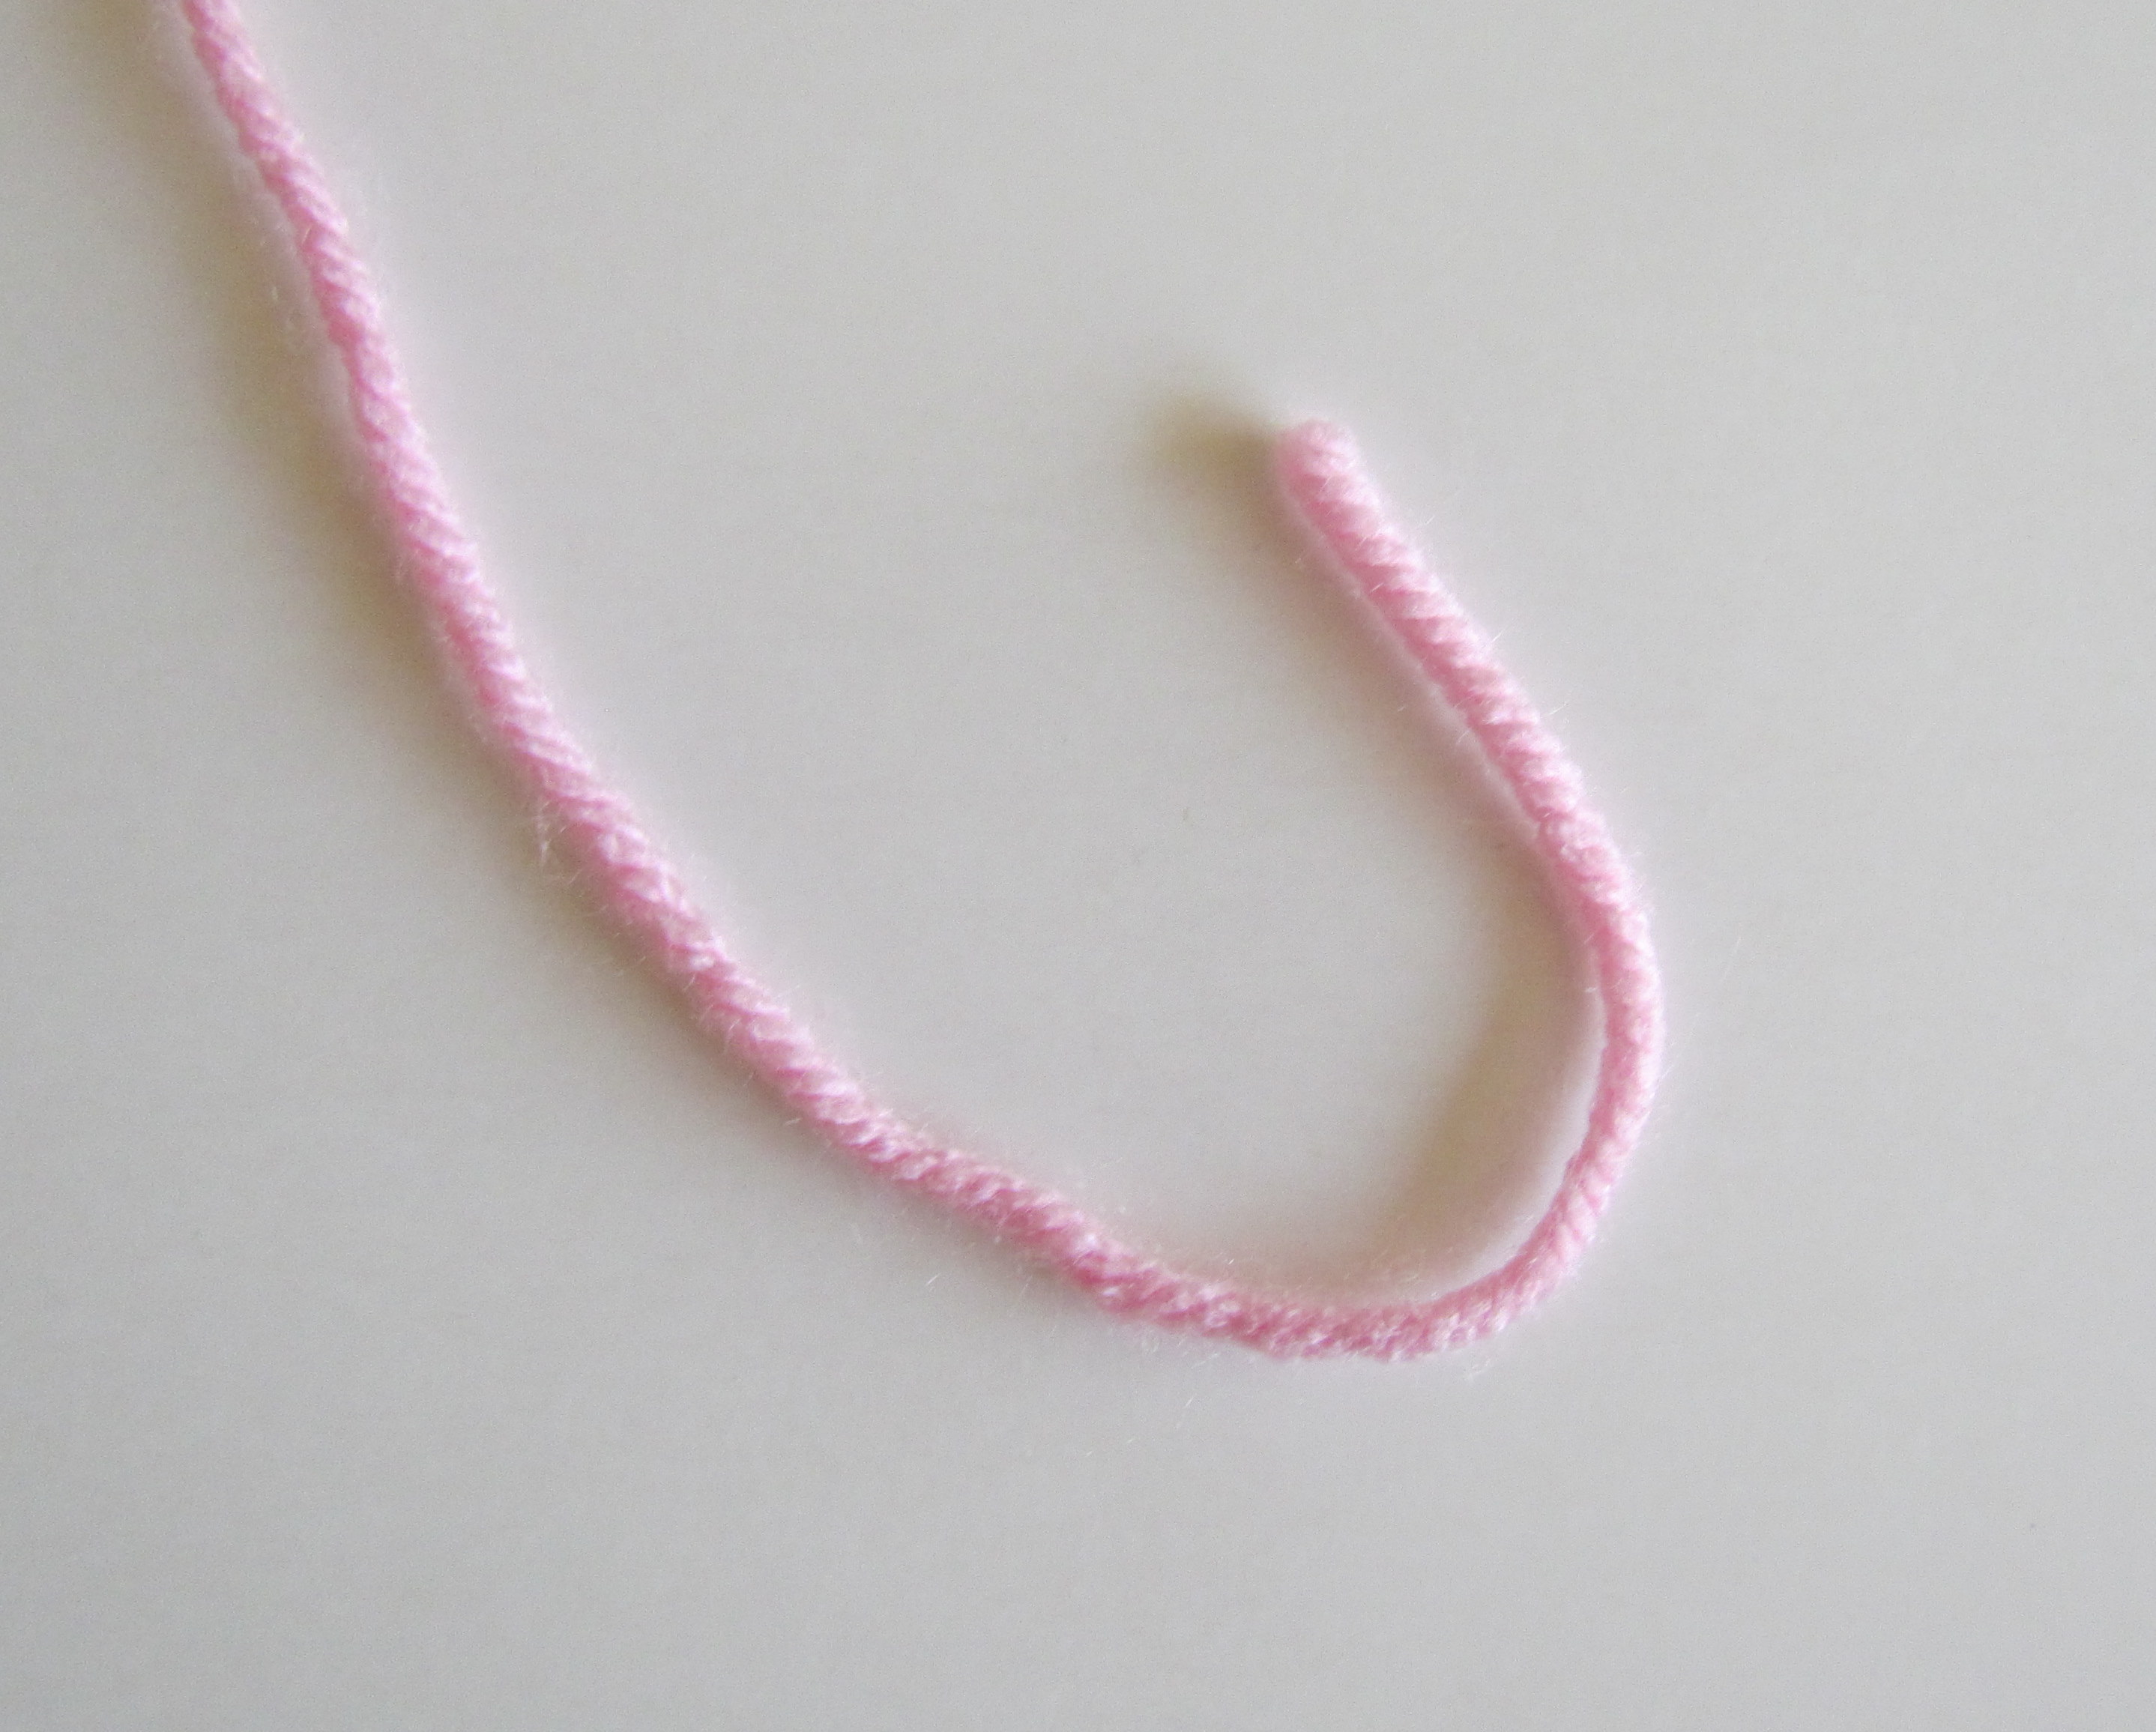
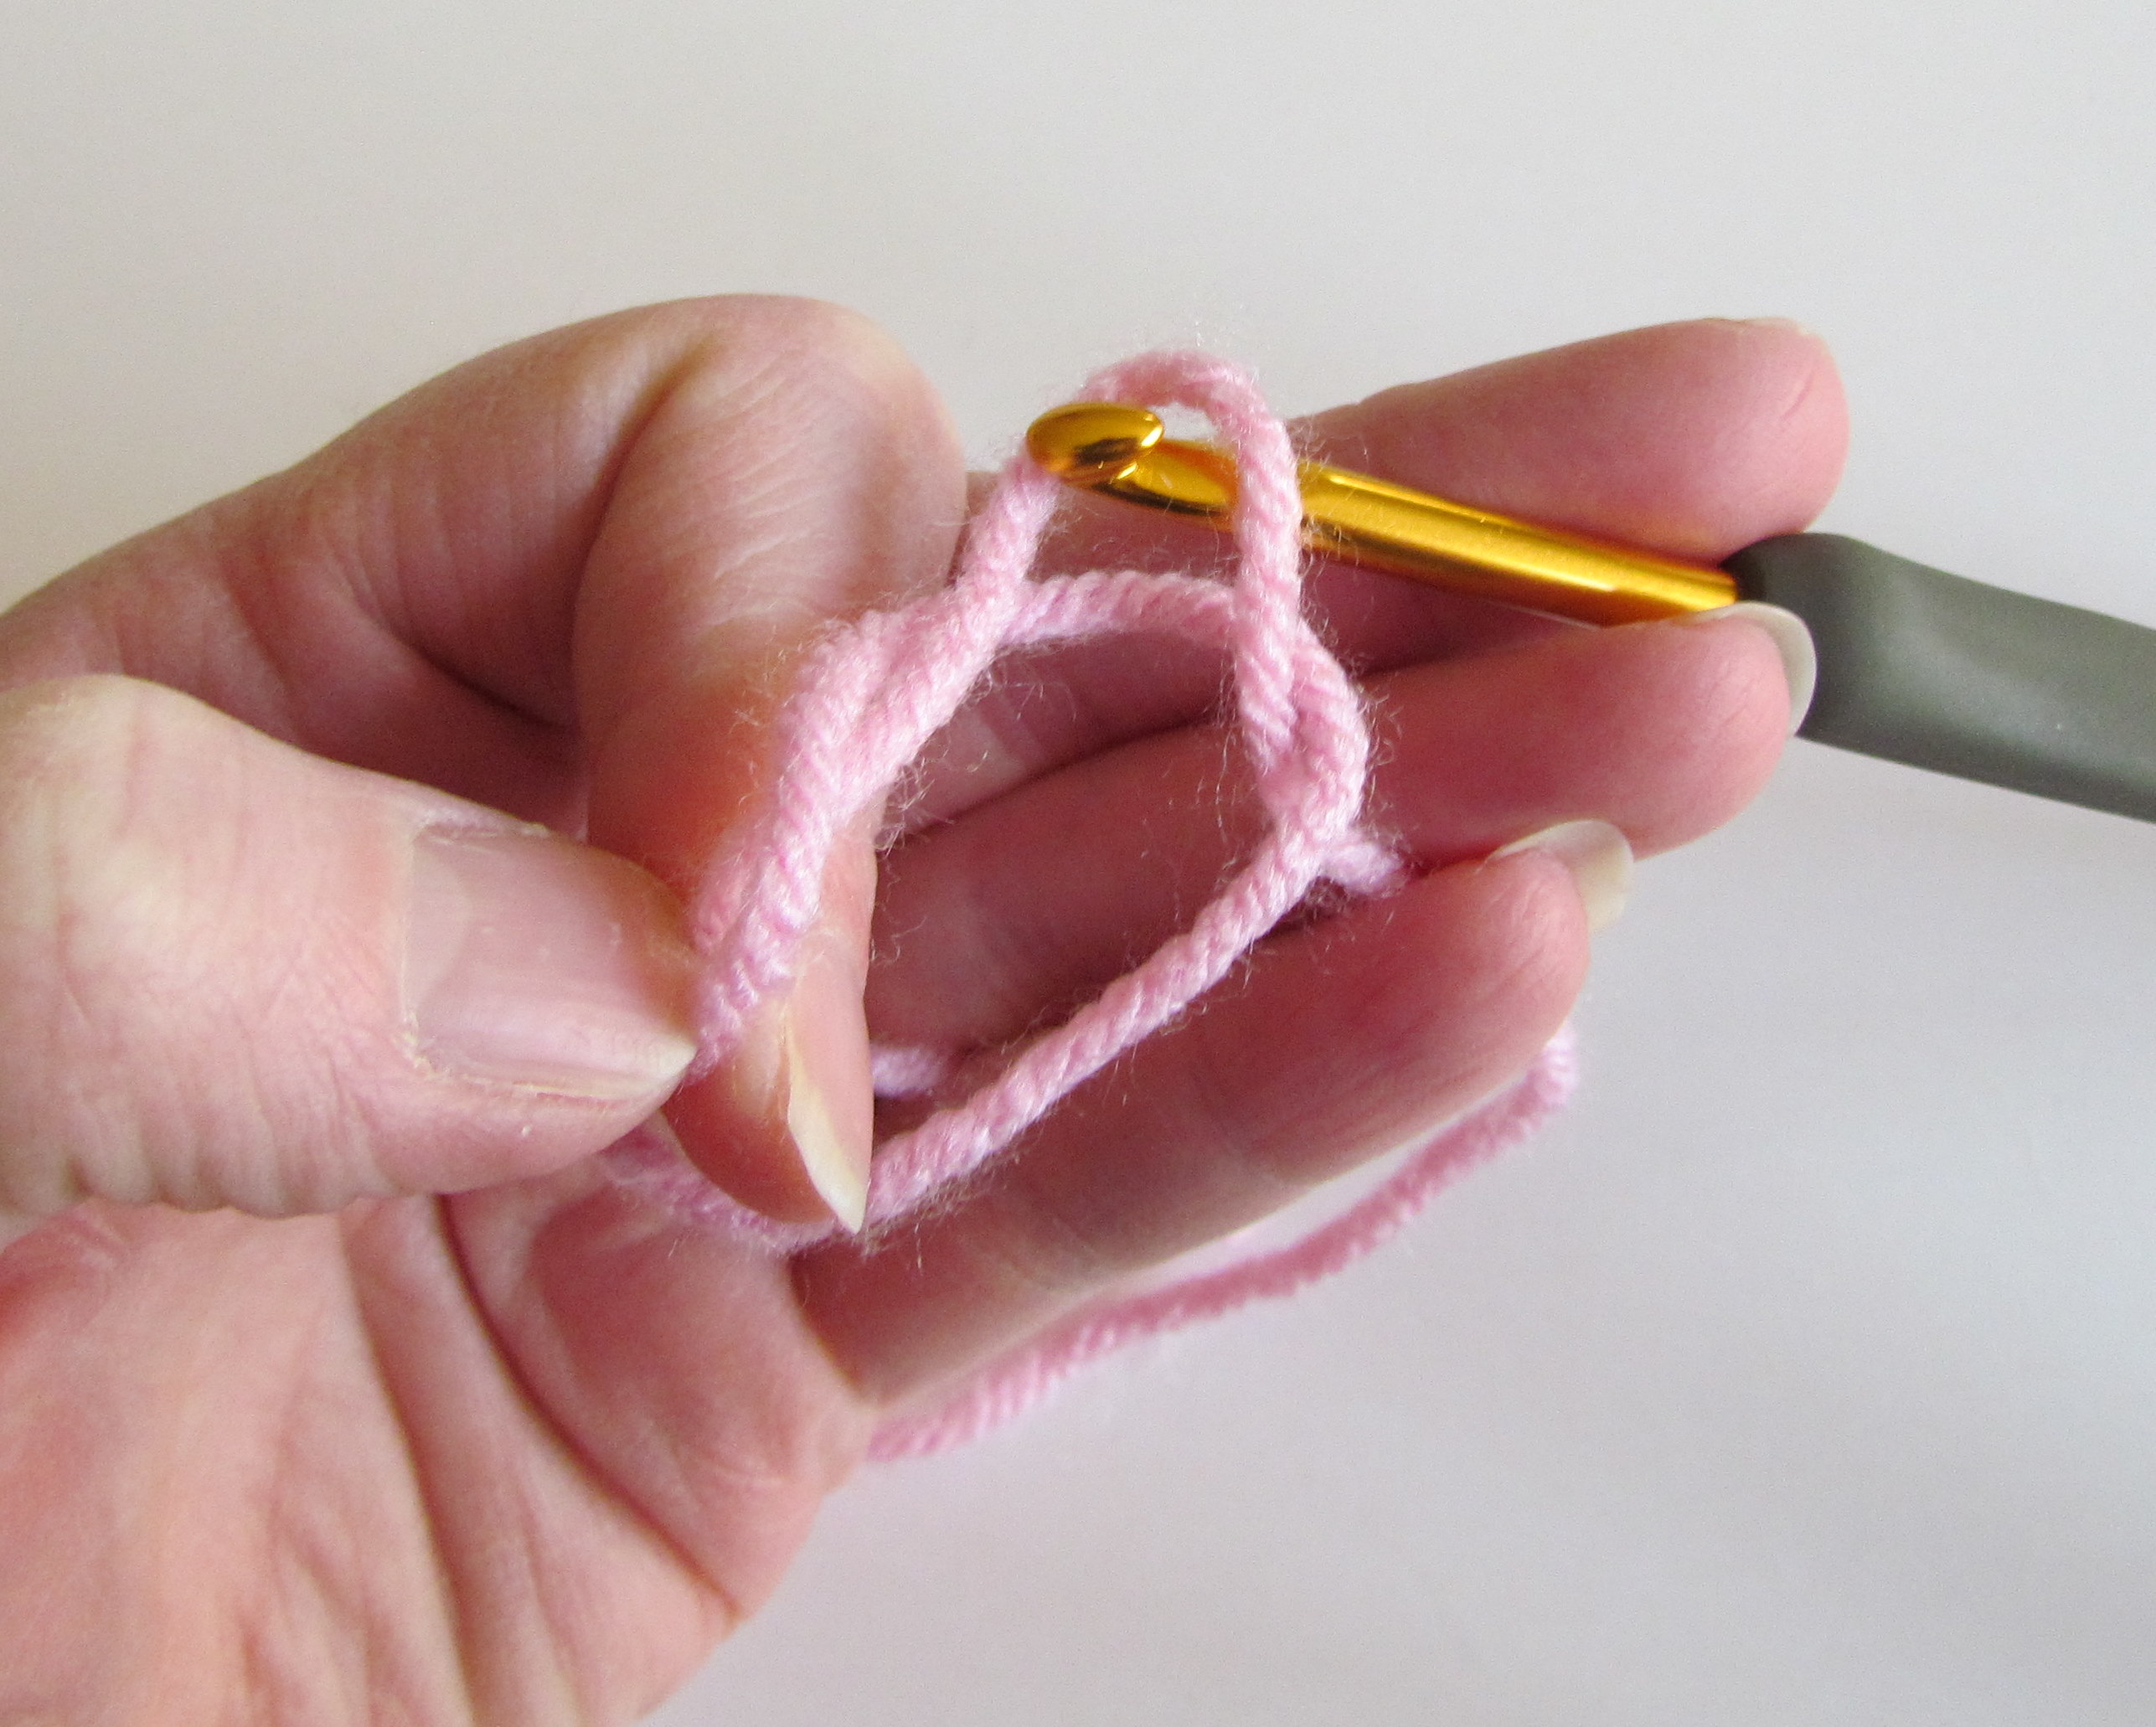
Step 1: Begin by making a backwards “J” with the end of your yarn.
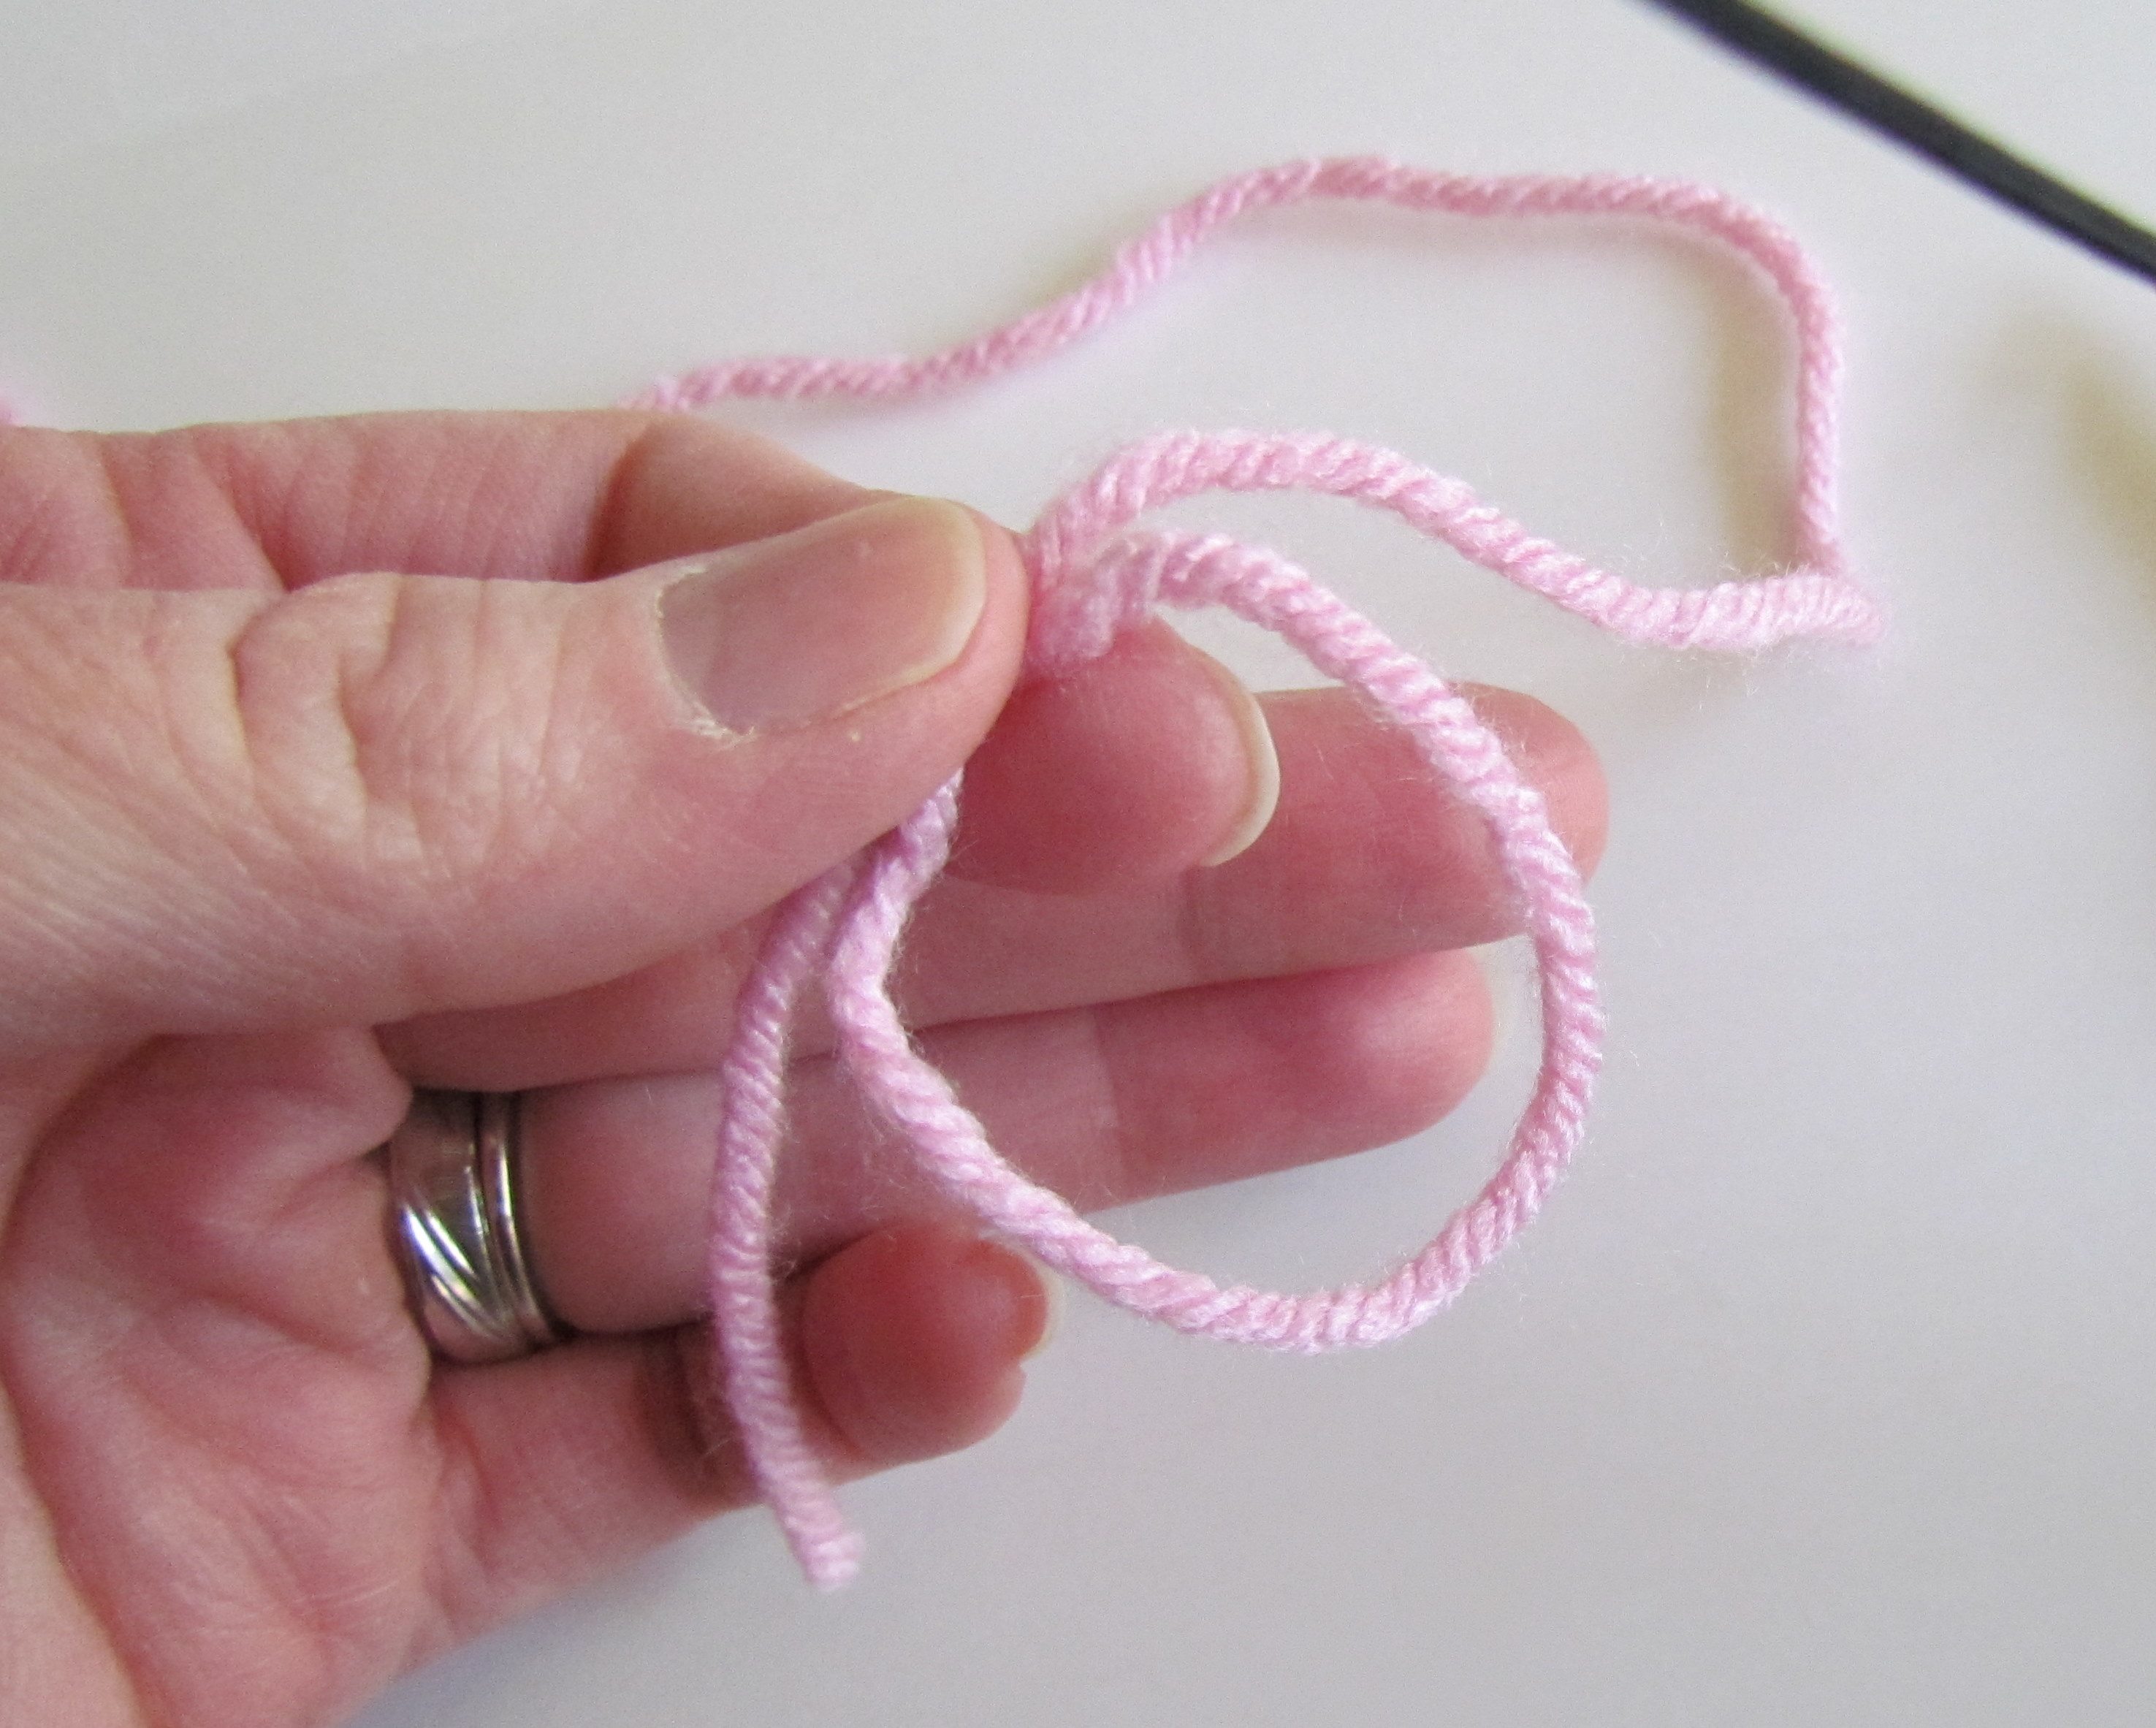
Step 2: Cross end of yarn behind your yarn coming from the skein.

Step 3: At this point you will need to pinch/hold the yarn together where they cross.
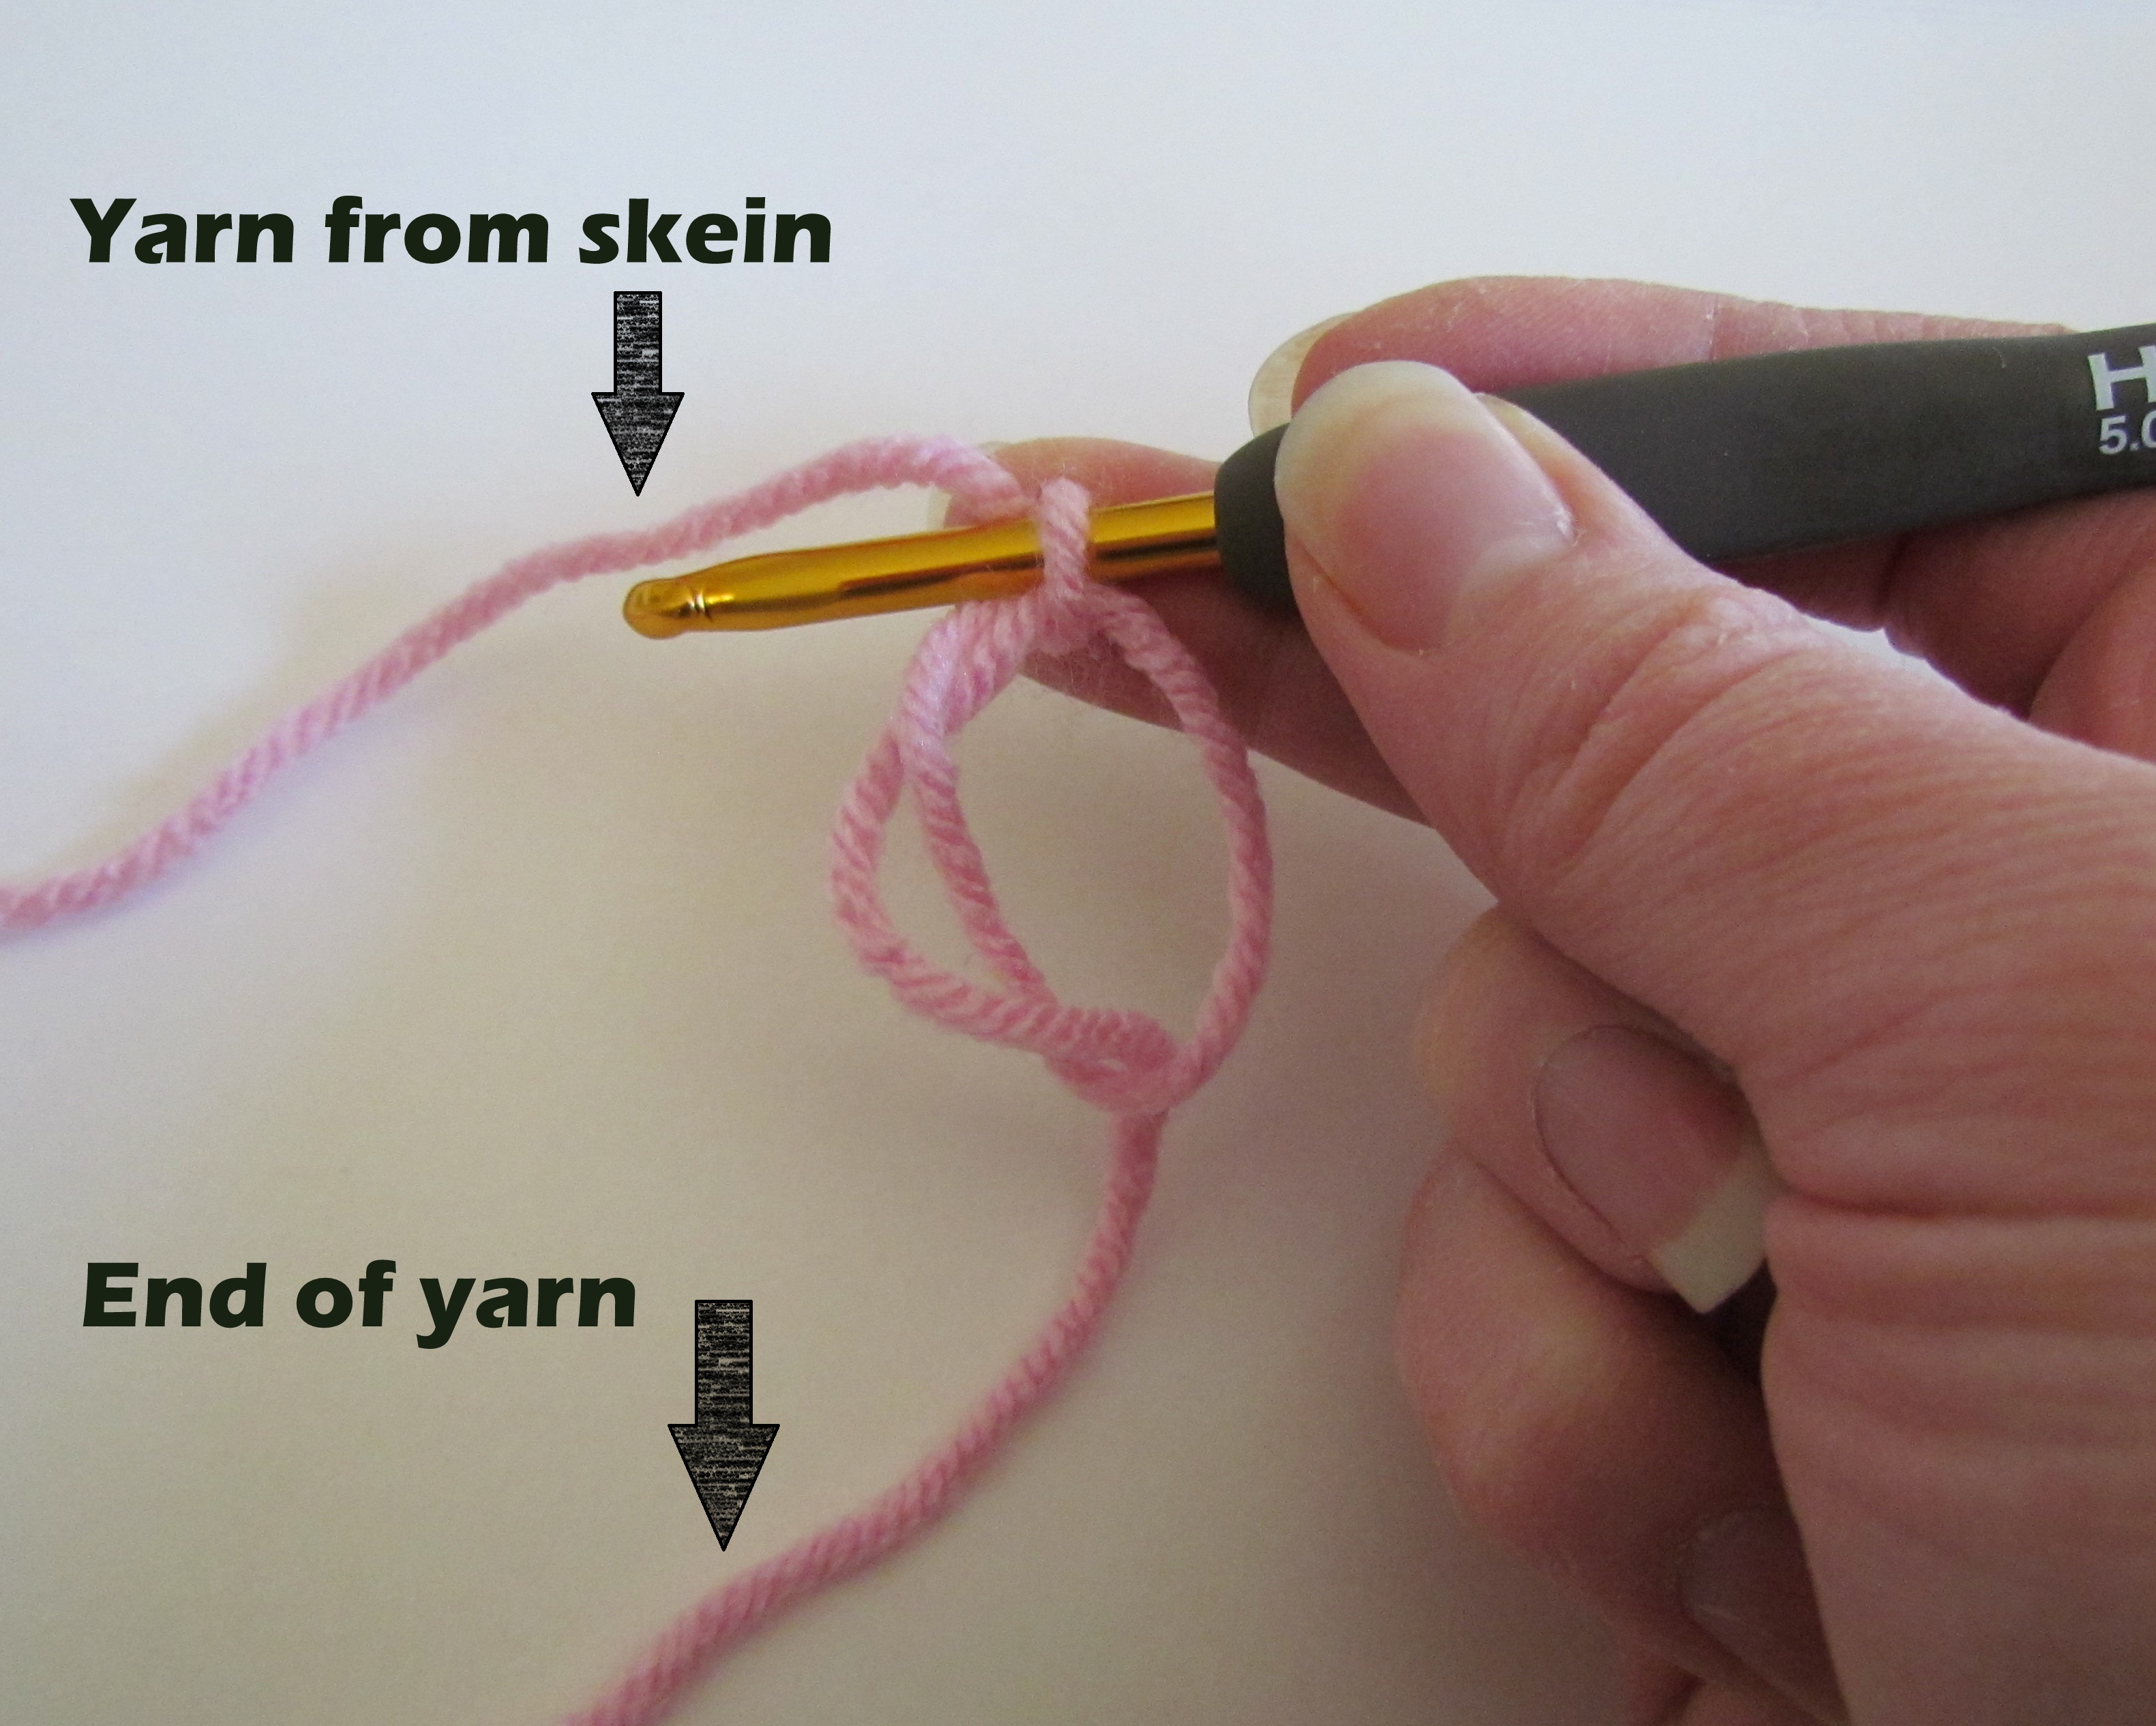
Step 4: Let yarn from skein fall behind loop. Insert hook and pull yarn through your ring.
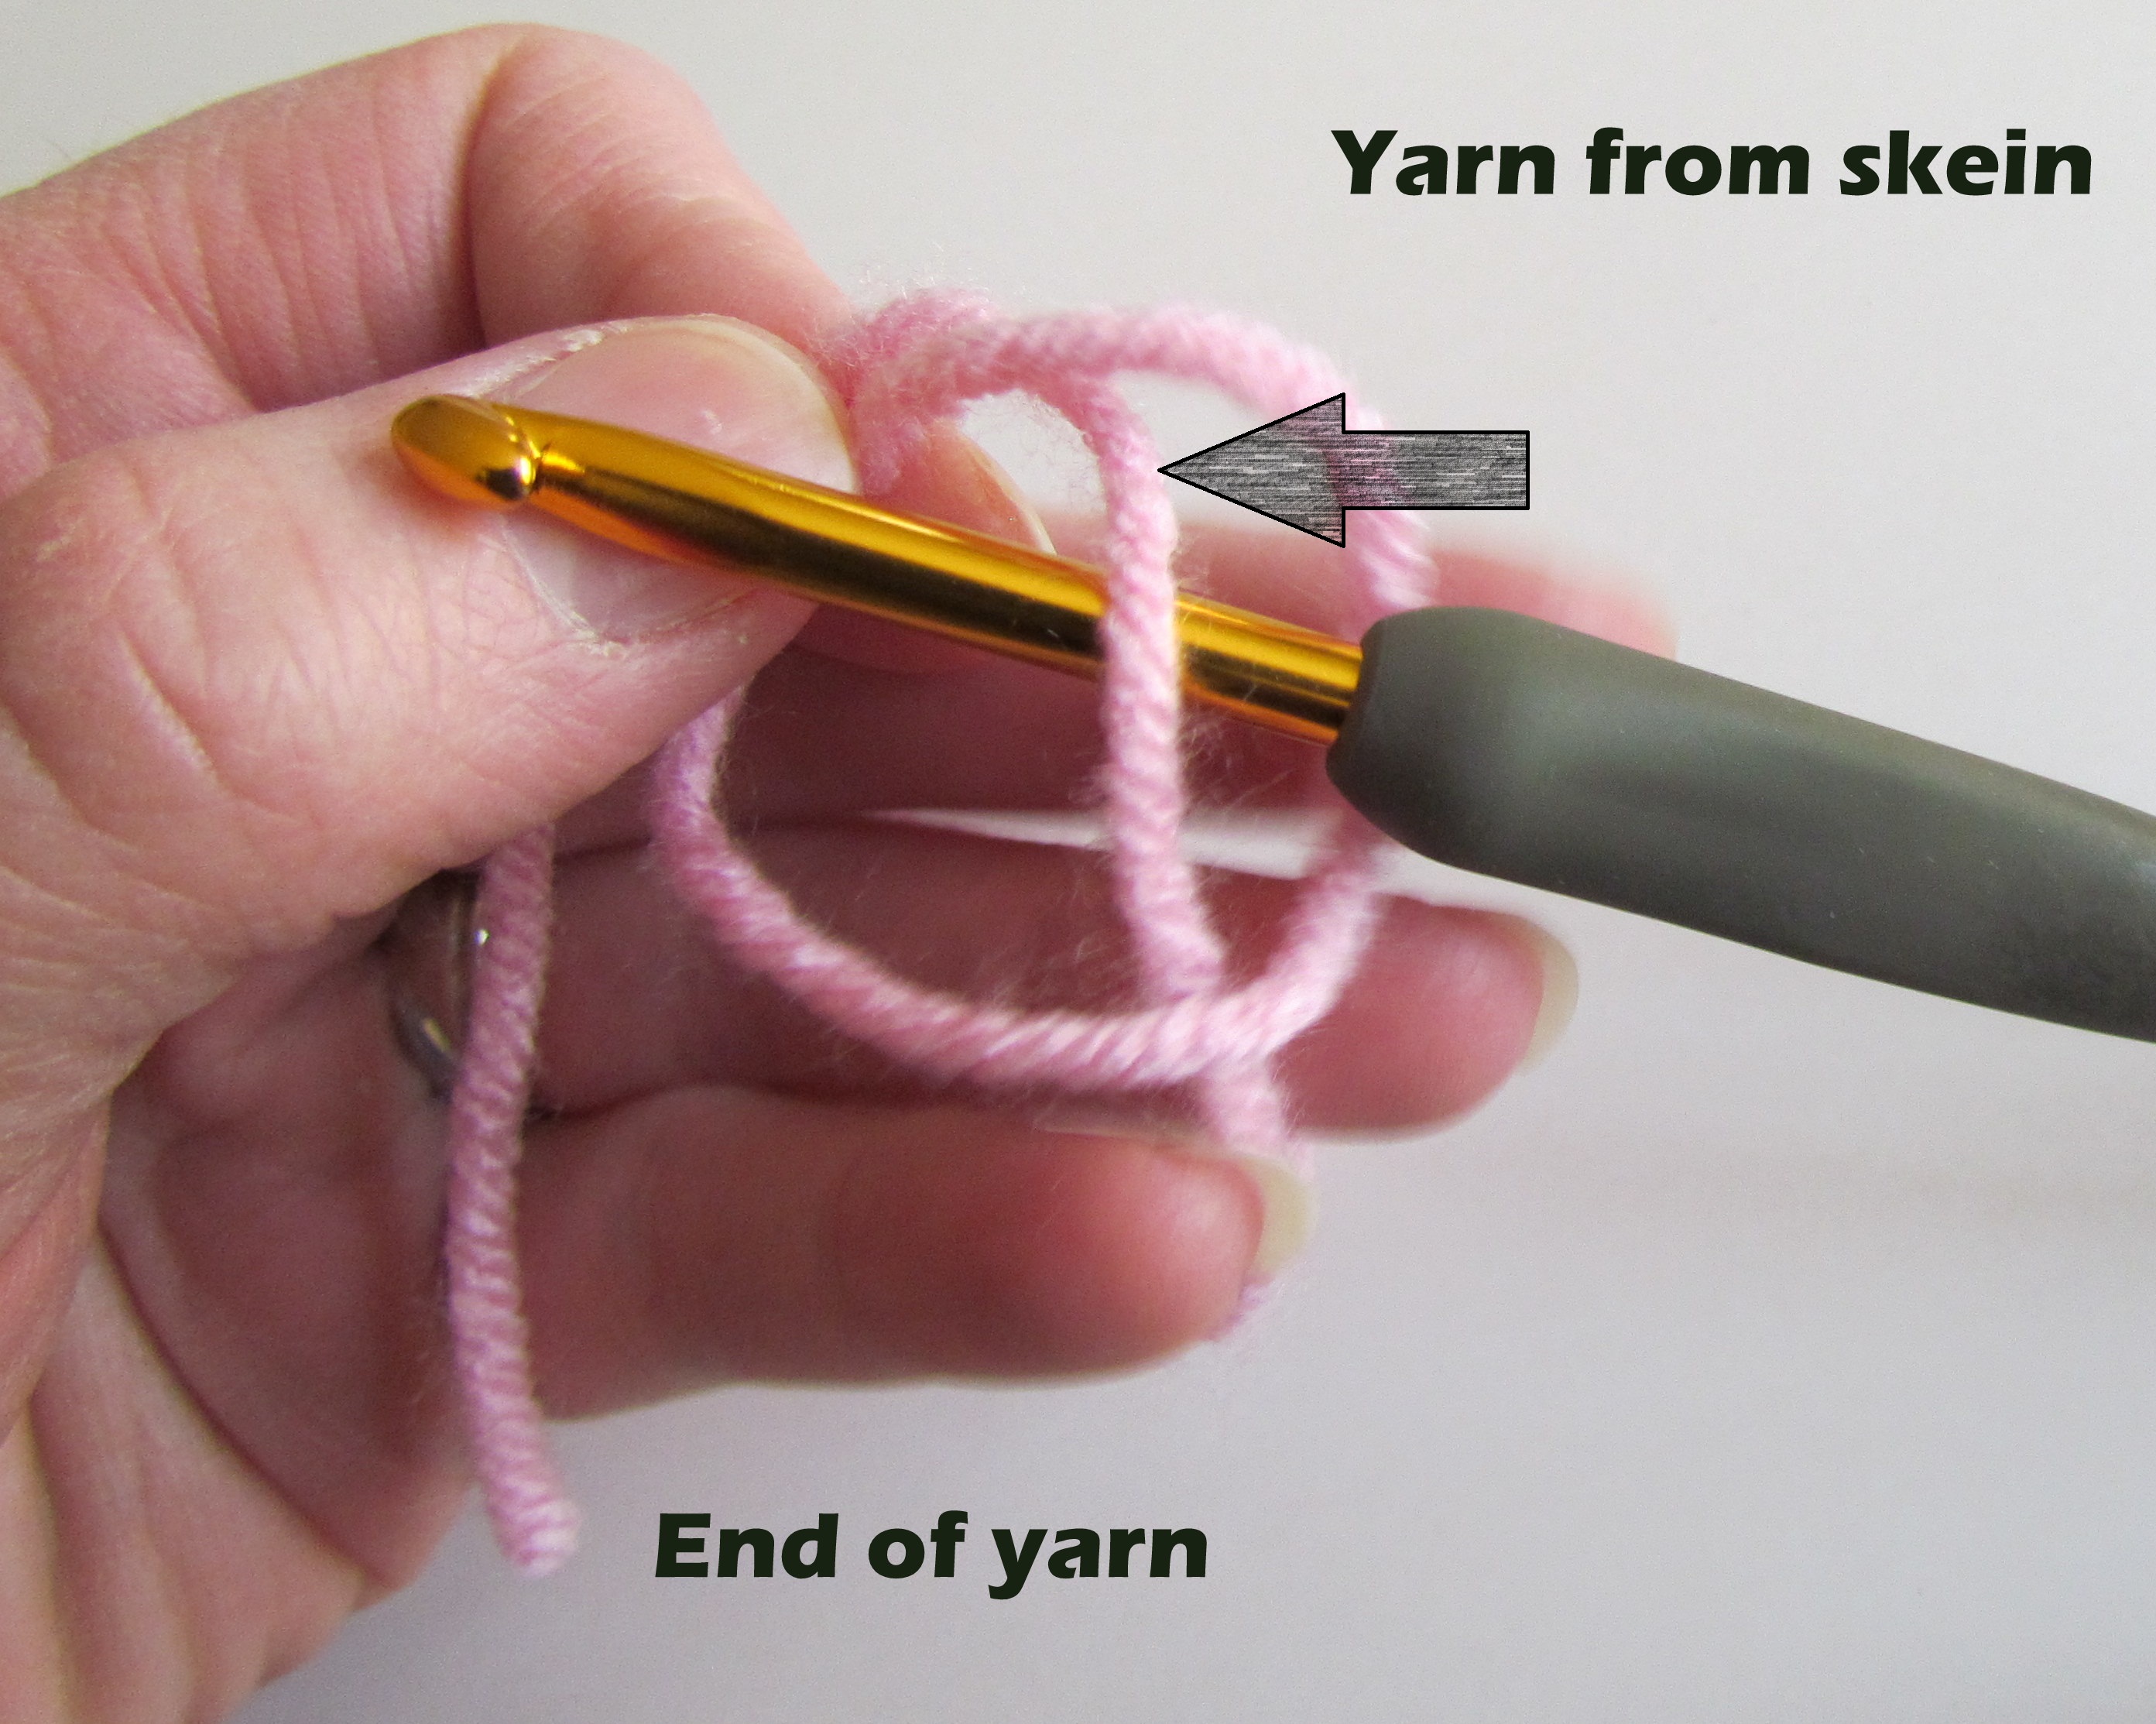
Step 5: Pull loop all the way through, and up to top of ring. (this may be the part that feels the most awkward, and takes some practice)
Step 6: Using your middle finger (or any finger that is comfortable) continue to hold the loop you just made, to the top of the ring. You can now let go of the ring with your left hand, where the 2 ends cross.
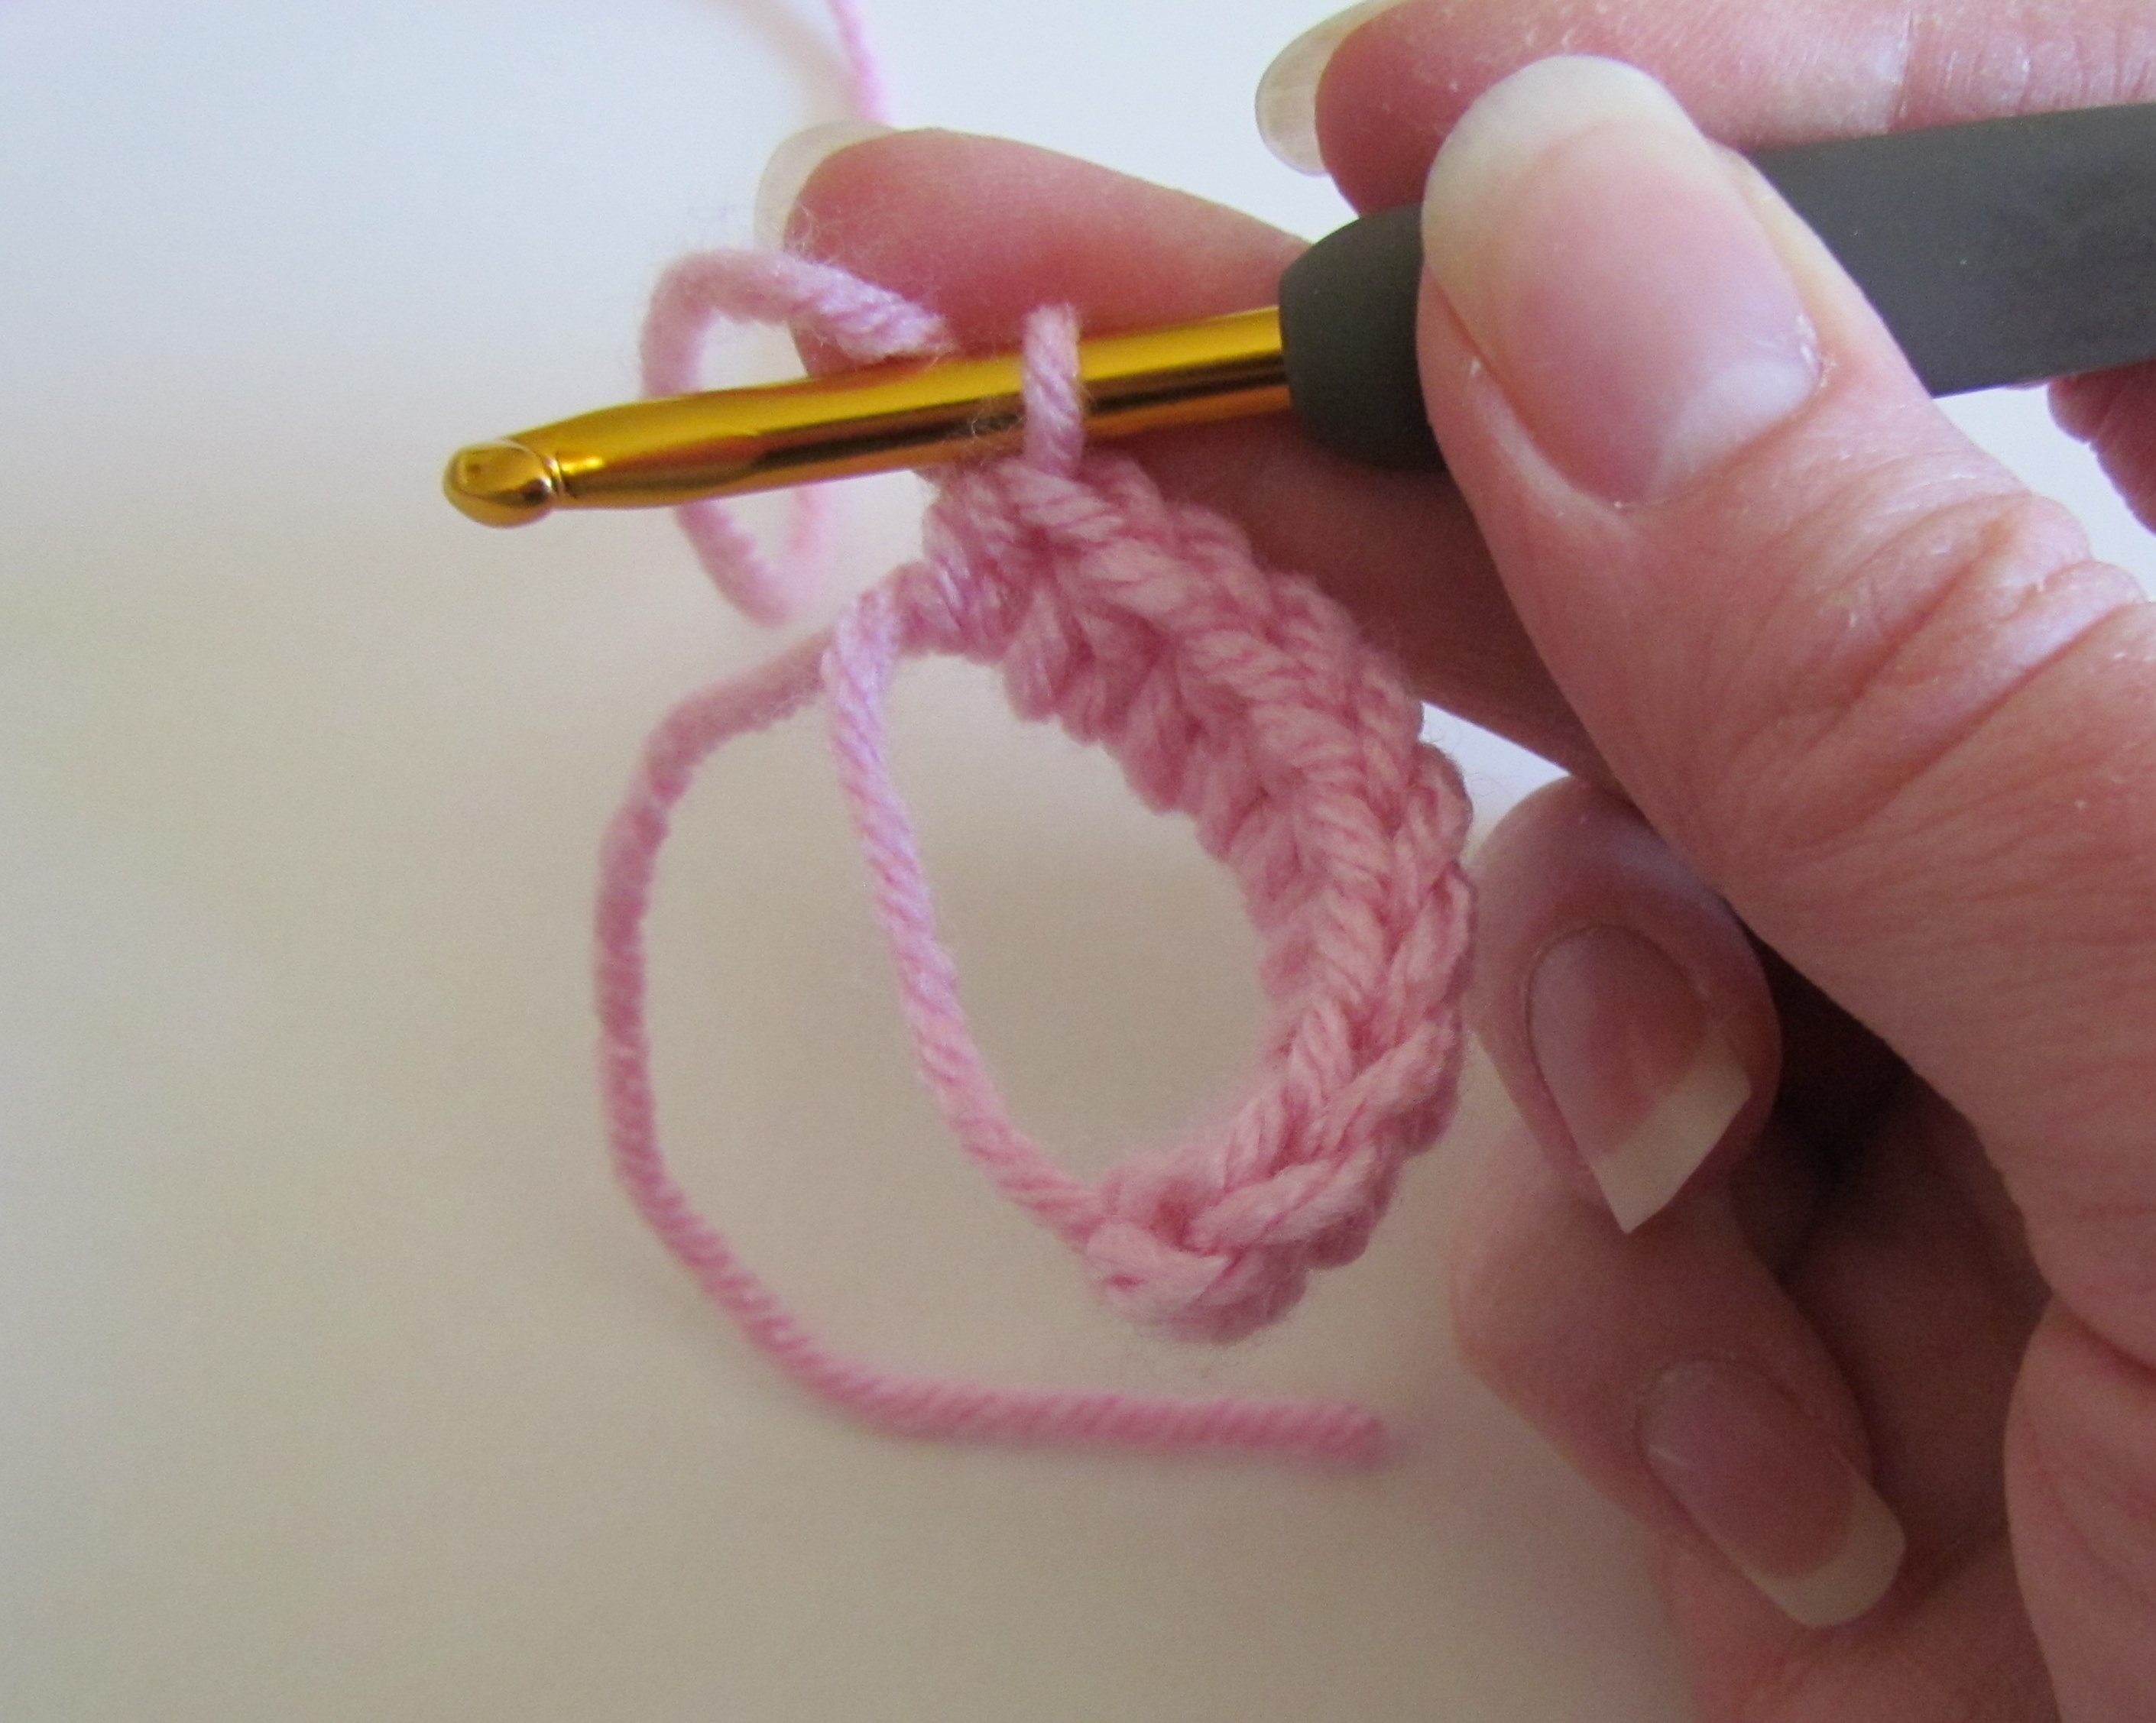
Step 7: Chain 1 for sc & hdc patterns. Chain 2 for dc patterns.

Step 8: Crochet as many stitches in the ring as your pattern calls for.
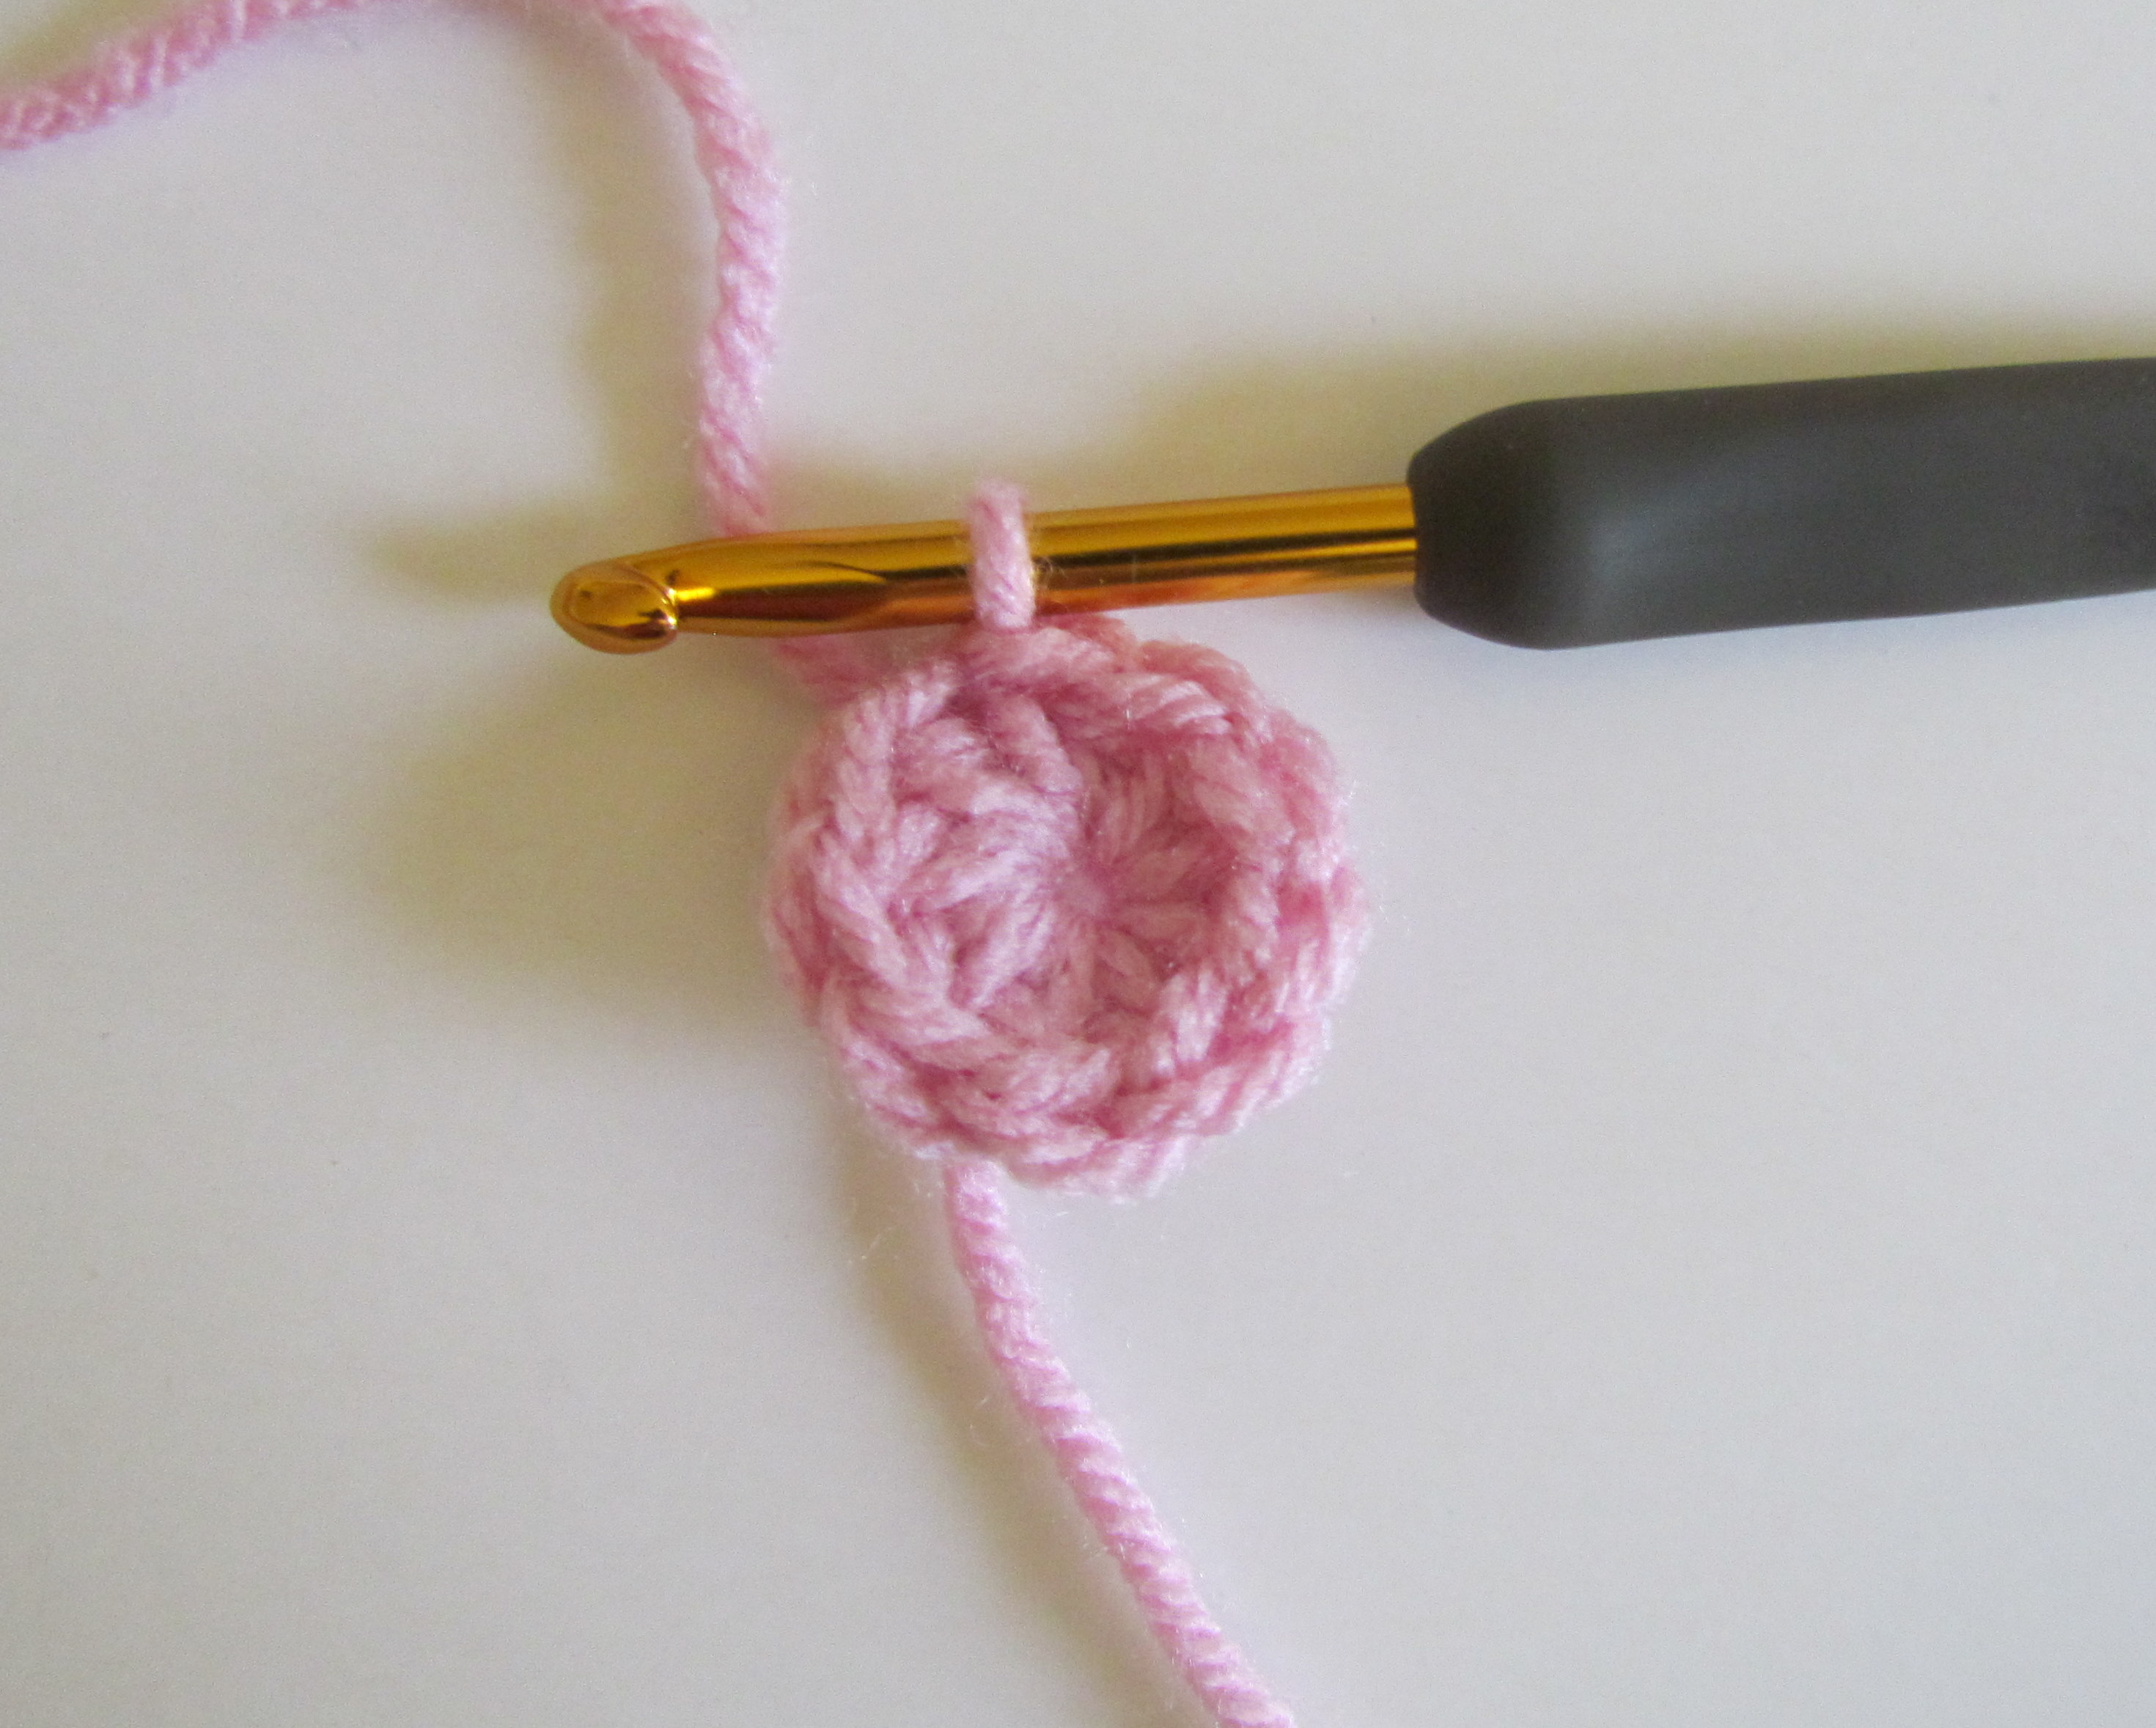
Step 9: Pull yarn end to seal circle.
If you do better with video instruction, or would just like to see it in action, you can check out my youtube video.
If something doesn’t make sense, or if you have any questions, just let me know. It takes some practice, but you’ll get it!
Happy Crocheting!

Lots of folks like to use this to start their granny squares. I don’t have much problem with a little hold, I must have a tighter gauge then some, plus I don’t do sc between the shells/clusters which make the whole thing more solid for me. A good trick though and good of you to post for folks.
I have been looking for the instructions for this technique – everywhere online and could not find it. THANKS so much.
Terri, you’re welcome! Let me know if there are any other tutorials you would like to see.
The best tutorial I found on Magic Rings – thank you som much
I would love to see crochet instructions on which loop to insert the hook from beginning AND after turns.
Thanks for asking!
Thankyou SO MUCH for this guide. I have driven myself crazy trying to follow other guides and getting frustrated and feeling like I must be totally stupid. Yours was the only one I could follow successfully.
Bless you for your kindness.
Thank you! Glad to hear. Let me know if you would like to see any other tutorials.
Oh how I wish I didn’t have to mirror image these directions! I’m a lefty and I crochet in the opposite direction. Trying to do this is making me a crazy person. Any help you can give?
I have been searching for a crochet pattern using embroidery floss for a large hackie sac. The ones I find seem too small, much smaller than the purchased ones. Do you have one or know of a website that has one?
Pamela, I don’t know of one, but I have asked on my facebook page. Maybe someone can help. I’ll let you know.
Thank you, I have tried and tried and I had given up I had another look and came across your site thank you now I can do it.
Cathy
Thank you, thank you, thank you!!! I had given up on learning how to do this and then your post came along to save the day!!!
So glad it helped, Ayanna!
ooh it’s magic! thank you so much – very easy instructions to follow :)
Thanks, Greta!
Success! Was beginning to feel like a magic ring failure, your instructions by far the best! Thanks so much :)
I follow these instructions but my circle never closes all the way. What am I doing wrong
Jessica, how many stitches are you putting inside the ring? If it’s more than 10 or 12 it may not close all the way. Try it with a smaller amount and see if it works. If not, let me know and I’ll come up with some other suggestions.
I am having the same problem, but I am confused as to a part of the instructions: Step 8. When you finish making the circle and start to crochet, the loops are in front of you. Do you crochet on top of them, or do you turn so that the plain yarn is in front of you and crochet on top of that? That(the second one) is what I’m doing, but when I pull the yarn, the circle doesn’t close
Ok, ladies. Let me make one and see if I can get some better pics for you.
These are great instructions and a big help! Thank you.
Thank you for the magic circle instructions. Yours are the best I’ve found.
Thank you!
Thank you very much. I had no problems following your instructions.
Hi,
Thank you for the tutorial! If I were to continue with a round of dc stitches after doing a round of sc stitches (like you did), would I chain 2?
Thank you
Yes, most people do a ch2 to start a new round.
I was looking at a book on Amazon and wanted to buy it but got scared off at the mention of “magic” circle”. So, I decided to do an Internet search to find out what it was. Thank you so much for posting this tutorial. It is so clear and it is just what I was looking for. I need not look any further. Now I know what magic circle means and I will buy that book that looks so appealing. Thanks again. =)
So glad it helped!
thank you for the tutorial
i left so many patterns to do just for magic ring as the pattern suggested begin with magic ring
Could you please explain how you crochet around the circle? I don’t get how to incorporate that piece of yarn into the chain. Really beginner. Thanks!
Hi Shanna,
Step 7 shows the ring, Step 8 shows actually crocheting your stitches in the center. So, you’ll be crocheting over the ring you just made. Hope that helps.
So I’m crocheting over the two pieces of yarn on the left of the ring in the step 7 image? I just keep ending up with a messy knot when I pull the yarn at the end. Clearly I’m doing something wrong. :( I feel like I need another image between 7 and 8.
Thank you so very much. Absolutely the clearest tutorial that can be found.
Thank you, Loren!
I am doing an amigurumi project that requires using the magic ring. It tells me to do about 8 increase rounds on it and I have so far done about 5. I noticed that it started looking odd. I have no idea how it got like that. It looks a little bit like a clover or a flower because it is kinda curling… I can’t really explain it…
I forgot to ad this :
How did this happen and how do I fix it? Or is it normal for that to happen when doing a lot of rounds on a magic ring?
Hi Emmy, without knowing what pattern you’re using, or what your project looks like, it would be hard for me to figure out what the problem is. Please don’t send me the pattern (copyright laws), but feel free to email me a picture of your project. Maybe I can help.
Hi, I’m beginning to crochet, and after a few tries I’ve gotten the spiral down just fine, but what’s troubling me is after I’m done with the project is how to close the drawstring end. It seems different from the regular slip knot because it has MANY stitches around it. Help! And thank you for posting this guide!
Hi Sophia, you would pull the beginning of the yarn end and it will close the loop. Shouldn’t matter how many stitches, but if you have more than 10 stitches you may have to pull a little harder to get it to close fully.
I got that part. I mean when I’m ready to finish the garment completely. The loop is closed, but I have a string hanging off now.
You would just tie it in like you tie in the rest of your ends. I try to weave in the opposite direction just so there’s no chance the loop would loosen over time.
Thank you for this tutorial! It’s super helpful and easy to understand.
I have learned to use the magic circle and really like it. I am attempting to make a solid granny square into a blanket. My problem is that it keeps curling. I am an “advanced” beginner. Can you tell me how to get rid of the curling?
Hi Beverly,
Check out this post I did a couple years ago. It has some tips on getting your project to lay flat. Let me know if you need additional help.
https://ambassadorcrochet.com/2010/09/07/getting-your-shape-to-lay-flat/
Hi, I’m trying to incorporate flower by doing a magic ring onto the end of a chain. I can’t get the ring to close up. Any suggestions? Thanks.
Hi Missey,
Normally when you crochet into the end of a chain that would not be considered a magic ring. Chances are you won’t be able to get it to close completely. (maybe with single crochet’s)
If you need more help just let me know.
~Kristine
do you know how to make a magic phone?????
(smile)
I kid you not I have tried to learn this five other times, and yours is the first to make sense!! Thank you
Glad it worked for you, Jo Anna!
I’m a visual learner, I follow your pictures and finally got it. It took me a few times. Now it easy.
Thanks so much.
Dsrlene
Glad to hear, Darlene!
I went through four other tutorials online in frustration trying to figure out how to do the magic circle. Thank you for your photographs and instructions, yours is the tutorial that worked for me!
So glad it helped, Tawnia!
God bless you, I was having SO much trouble with this! My stuffed wolf thanks you!
Glad it helped, Geri.
Glad it helped, Geri.
This may be the best and most detailed tutorial I’ve found. So many just give general direction and/or no pictures. Thank you!
You’re welcome! Glad it helped Tricia.
Thank you for the wonderful photo tutorial. I have a video tutorial and had a comment from a deaf woman asking for written instructions, as I do not have subtitles on my videos. I gave her the link to your tutorial. You saved the day!
I’m so glad this was a help Jessie! Thank you for letting me know.
Thank you for a great tutorial. After looking at your instructions, I understand the process, but as I’m trying to follow my pattern, which says:
1ch, 8 sc in magic ring, 1 slst in 1st sc (8 sts)
I end up with 9 sts. That first chain, plus 8 equals 9, not 8, so what am I missing?
Hi Sher, most patterns do not include the beginning ch of a round in the stitch count unless it tells you to. Hopefully that helps. Let me know if you still have questions.
Thank you for this tutorial with stills! The videos are just so much harder to learn from; this is clear and easy to follow.
You’re welcome, Gail! Glad it helped.
I could never get the hang of the magic ring. I tried so many different tutorials and videos and just got frustrated. But this one really helped! It only took me 3 tries instead of 20, :) THANK YOU!
Awesome, Dara! Glad it worked for you.
Thank you for sharing this tip. I too was a little confused as how to make a Magic ring.
Your pictures definitely cleared any confusion I had….great job!
I’m glad it helped, Carol!
Glad it helped, Carol!
I am a self taught crocheter. I have been doing the “Magic Ring” for years. Didn’t know that as the name for it though. LOL. I went to the site you recommended where you mentioned “extended” sc and dc. I do not understand what an extended sc (single crotchet) & dc (double crotchet).
If you answer this please let me know when & where I will find it. I loose to much stuff on the computer, and I don’t know HOW or WHY I do it. LOL Some times I do find it, but can’t always remember WHY I wanted it. Oh the joys of getting OLD. I’m 4 score PLUS some.
Hi Anna,
Here are the links to my edc & esc tutorials.
Extended double crochet – https://ambassadorcrochet.com/2010/09/27/extended-double-crochet-stitch-of-the-week/
Extended single crochet – https://ambassadorcrochet.com/2010/09/20/extended-single-crochet-stitch-of-the-week/
Hope that helps.
After countless instructions on how to make a magic ring, I had given up on ever being able to do it. I just came across your site this morning, seen you had a how to and just tried it. A couple of times and I’ve mastered it. Then when I go to leave a comment I see everyone is echoing my success. I don’t know exactly what it is about it, perhaps the simplicity or we just found someone who teaches for the way we learn?? Anyway, thank you, so many more patterns have become accessible to me.
I did it! I did it! Thanks for finally making a magic tutorial I could follow!
So happy to hear this!
Oops, I put my question in the wrong place, I think. Anyway, I’m a lefty and learned to crochet mirror imaging my mother. This is giving me a headache! Do you have any suggestions or hope?
I’m not sure. Let me see if I can figure it out for you, Kathi.
If you can’t figure out a lefty way, how could I make it look approx. the same the old way. (Ch circle, stitches inside, etc)
My problem is my instructions say to only make a circle with 6 chains. Then I am supposed to make 20 DC in the circle. Can you help me with this? The circle is only 6 chains but I don’t think that is big enough for 20 DC in the circle.
I’m not sure what you’re making, but a magic ring can fit 12 dc in it (without a hole in the center). I would think, as long as your chains aren’t super tight, that you would be able to fit all 20. Try it first, you might be surprised.
Amazing – finally I get it! Great tutorial!!
Yay!
Lovely clear instructions and photos. I’m just getting started with finger crochet and looking for best ideas for beginnings and ends! Think I will be referring back to this often. Thank you.
Glad to hear!
OMG ~~ Piece of cake! Starting out with a backwards ‘J’ is what helped me to understand. Thanks so much for your clear directions and pictures!
Yay! I’m SO glad this helped!
When a pattern calls for a magic ring, but does not give you the amount of stitches
to cast on……what do we do??……..I make baby hats with a charity group.. The hats are usually for a 0-6month old baby…thanks so much…cannot wait to
make the kitten hat (without the flaps)…..
Hi Aileen,
Without knowing which pattern you’re using, I’m going to say it’s just the number of stitches in the first row.
Hi Aileen, I’m sorry I’m just seeing this. It really depends on the stitch you’re using in that first round. But for basics I almost always use 6 sc, 9 hdc, or 12 dc in the magic ring.
You lost me at Step 6
Did I lose you because you can’t figure out how to hold it? Or because it’s a hard an awkward position to hold your hands until you get used to it?
This is by far the best instructions,and that includes the ones on U-tube! Thank you so much!
Thank you so much!
I’m a complete beginner at crochet and an average knitter. I am stuck at step 7 because it feels awkward and am not sure exactly how to add the st on. Im also not completely familiar with crochet pattern abbreviations.
Hi Kate, I think it’s completely normal for it to feel awkward until you do it quite a few times.
Hi, I’ve watched many tutorials for this (an upside to starting to crochet in a time when videos are easily recorded and uploaded!) but this has been really helpful for jogging my memory of what the steps are – I can’t seem to get it to stick in my mind but I also don’t need a 5minute explainer any more, so this has been absolutely perfect to just remind myself and get on with it. Plus with help from the pictures I think I understand how the loop is formed, why it works, which I couldn’t get from videos. Thanks so much!
I’m so glad this was helpful!
Sorry but what do you mean by sealing the circle by pulling the end of the yarn?
You will take the end of the yarn (not attached to the ball) and slowly pull it. As you pull it will close the gap that is left at the center of the circle.
I,too finally found the magic instructions for the magic circle.I no longer have to try bending my fingers in directions they were not intended to go.THANK YOU, THANK YOU. Had I only found you first
Thanks, Joyce! I’m so glad this was helpful.
If a pattern reads as below do we complete your instructions and then start at #1 below? How do we know how many stitches the magic ring calls for?
“Magic circle
Round 1) Ch 1, then 8 hdc into the circle.”
Hi Michelle,
What that pattern is saying is to make the magic ring and then ch 1, 8 hdc right into the magic ring. Some designers will write it as all the same line instructions but some will word it like this because the 8 hdc actually makes the first round. Does that help?
I have used magic rings multiple time over the years but always have to find a tutorial (or three to get started, lol). This is by far the best and easiest tutorial I have ever found and used! Thank you for posting it, for once my magic ring worked on the first try and closed correctly. This is a game changer! Thank you so much! Bookmarking this page. 😊
I absolutely love when this helps someone! Thank you for letting me know and definitely bookmark/Pin it so you can come back to it later.
Kristine
I agree with previous comments. I looked a bunch of magic ring tutorials and this was the only one that made sense the whole way through. I’ve been crocheting for years but this is the first time I’ve had magic ring success. Thank you!
Yay! I’m so glad to hear that Martine!